 The Myth of the Modular Monolith at Rails World. Photo by Aaron Patterson.
Engineering Rigor in the AI Age: Building a Benchmark You Can Trust
The Rails Infrastructure team built an open-source toolkit for benchmarking Bundler performance reliably across machines. Along the way I learned that AI is great for scaffolding, but you can’t oursource the engineering rigor required to catch when numbers don’t add up.
Read more on the Shopify’s Rails at Scale Blog
Where Identity Begins: Becoming Eileen Alayce
The New Year often brings a rethinking of one’s habits, future, and identity. For me this year my future identity is more important than it ever was.
Most of you don’t know that 2024 into 2025 was a deeply painful year for me. I wrote my 2024 Rails World keynote while my now ex-husband was moving out of the home we’d shared for 11 years. I put on a brave face and went to the conference. And even though it felt like my life was falling apart, I gave the best damn talk of my career. Being on stage reminded me that I’m strong, capable, and have a lot of support from the community. I’ll never forget the way my friends showed up for me that weekend.
Now that I’m divorced and through the most difficult challenges, I’m rebuilding my identity, starting with a new last name - “Alayce”. The future I’m stepping into feels wider, brighter, and entirely my own.
You may be wondering why I chose to create a new name instead of going back to my prior surname. After a lot of thought I decided I wanted a name that feels unique and exciting. I wanted a name to commemorate and represent my future life, the next chapter that I’ve entered. And most importantly I wanted a name that I will never ever be tempted to change again because this one is completely mine.
Coming up with this name was a fun journey of trying on different last names until one felt right. I developed a set of rules to follow to make the elimination process more straightforward.
The first last name I came up with was “Codes” because it’s already my identity online and professionally I’ve been “eileencodes” longer than I was married. It would be an easy shift that didn’t invite too many questions and wouldn’t give me an identity crisis. It fit into the criteria I set, but I tossed it out as an option because I didn’t want to tie my identity to my work. And while I love coding, I hope to have a long and happy life, and not feel like my entire life orbits solely around my work. “Ruby” was out for the same reason. I don’t think I need to explain why “Rails” was never in the running.
From there I tried on “Lovelace” after Ada Lovelace, the first computer programmer. This also tied my identity to work, but in a more abstract way. I liked how it sounded with “Eileen” until I heard someone pronounce “Lovelace” as “Loveless”. The book “East of Eden” made me superstitious about names. I don’t want a loveless life and so I tossed this name out too.
Every time I thought of a name, I’d try it on, say it out loud, write it down, use the web inspector to see it in the browser next to my photo online. I thought about where I lived and what I loved. I imagined using “Hudson” (for the river), “York” (for the state), or even the city I live in. I explored the names of places I love to travel to like “Paris”, “Berlin”, and “Amsterdam”. I thought about the names of artists, poets, and musicians. Then the names of streets and colors and flowers. I thought of every word I have ever loved. I thought of “Arya”, my dog, and how I could incorporate her name. But while I love all these things, none of them felt like the name I should have always had.
I started looking back in my family tree for names I might like - Grogan, Peabody, Crawford - but none felt right. I started to wonder: who could I honor without fully taking their name? I always felt a closeness to my maternal grandfather who passed away when I was in 5th grade. He loved technology and photography. He worked on the Hubble telescope (yes I even tried out “Hubble” too) and in many ways we were similar. I often wonder if he’d be proud of me and the life I’ve built.
My grandfather’s original last name was “Sienkewicz”. This violated every single one of the rules I had set so that was obviously a no-go (I’m not even sure this is the correct spelling so it violated my “easy to spell over the phone” rule). After WW2 he changed his name to “Wallace”.
I contemplated “Wallace” but it didn’t feel right so I started dismantling it to make a new name. First I dropped the “W” to get “Allace”. It felt like I was getting closer to a name I could love. I wanted it to be pronounced “Ah-lay-ce” not “All-aace”, so I dropped an “L” and got “Alace”. This felt more right, but it would likely get pronounced as “Alice”. I then added a “y” to create “Alayce”. I played around with other spellings like “Alaice”, “Alasce”, “Alaece” but kept coming back to “Alayce”. I like the way it sounds, especially as “Eileen Alayce”. I enjoy writing it out, I appreciate the way it looks on paper and in print. And most importantly it meets all of the criteria I had set.
I knew I had finally found the name that was always meant to be mine. I’ve sat with this new name for a while to make sure I didn’t change my mind. It’s been months and it still feels right. So now that the court system has approved it, it’s time to introduce myself to all of you.
I want to take a moment to say how grateful I am for everyone who has supported me this past year. I don’t know if I’ll ever be able to express how much you all mean to me and how appreciative I am that you showed up for me. Thank you to my friends and family, sincerely. See you around the internet and hopefully in real life soon as “Eileen Alayce”. Here’s to writing our own stories and building a life we’re proud to thrive in.
The Case Against Monkey Patching
Monkey patching is considered one of the more powerful features of the Ruby programming language. However, by the end of this post I’m hoping to convince you that they should be used sparingly, if at all, because they are brittle, dangerous, and often unnecessary. I’ll also share tips on how to use them as safely as possible in the rare cases where you do need to monkey patch.
Read more on the Shopify Engineering Blog
Adding support for cross-cluster associations to Rails 7
At GitHub, we recently added a new feature to Rails that will be available in 7.0: support for handling associations across database clusters. Read about it on the blog.
Upgrading GitHub to Ruby 2.7
Read about GitHub’s Ruby 2.7 upgrade at https://github.blog/2020-08-25-upgrading-github-to-ruby-2-7/.
Running GitHub on Rails 6.0
Read about GitHub’s Rails 6.0 upgrade at https://github.blog/2019-09-09-running-github-on-rails-6-0/.
Upgrading GitHub from 3.2 to 5.2
Read about GitHub’s Rails upgrade at https://github.blog/2018-09-28-upgrading-github-from-rails-3-2-to-5-2/.
HTTP2 Early Hints
Update: The PR’s discussed in this blog post have been merged. You can try out Early Hints by using Rails and Puma master. You’ll need to also use Arel master until Rails 5.2 is released.
Recently I’ve been working with Aaron Patterson on implementing the HTTP2 Early Hints.
The spec for Early Hints is still in draft but explains the requirements for implementation. In order to start preparing Rails and Rack for HTTP2 we’ve implemented Early Hints handling in Puma and Rails.
As of today (September 29, 2017) the pull requests haven’t been merged but we’d love for you to try them out if you’re interested in implementing Early Hints. A lot of this work is somewhat experimental so try it on production at your own risk.
In this post I’ll go over what early hints are, what the spec expects, and finally how to use the two pull requests to test it out on your own application.
Early Hints, what huh?
Early Hints is a new HTTP status code that allows your application to send links to assets that you would like to load early. For example if you have a stylesheet and javascript file included in your Rails application you may want to tell the client about them early so it can start downloading them.
The Early Hints spec contains header Links with references to those resources that you need downloaded early. An example response from the server looks like this:
 HTTP/1.1 103 Early Hints
 Link: </style.css>; rel=preload; as=style
 Link: </script.js>; rel=preload; as=script

 HTTP/1.1 200 OK
 Date: Fri, 26 May 2017 10:02:11 GMT
 Content-Length: 1234
 Content-Type: text/html; charset=utf-8
 Link: </style.css>; rel=preload; as=style
 Link: </script.js>; rel=preload; as=script
There are 2 responses, one for Early Hints that sends the linked resources and one for the final request that should also include the same links.
For the Link header, Link: </style.css>; rel=preload; as=style the style.css is the path to the css file, rel does not change and should be preload, and as is the type of resource you’re sending. The as is not required, but is useful for content-security policies.
While HTTP/1.1 can accept a 103, a server might not actually send the hints unless it absolutely knows they will be accepted. HTTP/2 is less likely to have this problem as handling of response headers doesn’t affect how the response body is determined (as noted in the spec.
Implementing Early Hints with Puma and Rails
The Puma PR and Rails PR are both a work in progress so they are likely to change before we merge them into their respective projects.
Below I’ll describe how you can try these two out in your Rails app. First make sure you’re using the Rails and Puma gems set to the branch for these PRs’
# Gemfile

gem 'rails', git: 'https://github.com/eileencodes/rails', branch: 'early-hints'
gem 'puma', git: 'https://github.com/eileencodes/puma', branch: 'early-hints'
gem 'arel', git: 'https://github.com/rails/arel'
Next you’ll need a proxy that can handle HTTP/2.
Install h2o via homebrew or the method you need for your computer. I used homebrew with brew install h2o.
Find the h2o config file (mine is in /usr/local/etc/h2o/h2o.conf and update it with the following:
hosts:
  "localhost":
    listen:
      port: 9090
      ssl:
        certificate-file: /usr/local/etc/h2o/localhost.crt
        key-file: /usr/local/etc/h2o/localhost.key
    paths:
      "/":
        proxy.reverse.url: "http://127.0.0.1:3000/"

access-log: /usr/local/var/h2o/access-log
error-log: /usr/local/var/h2o/error-log
Next you’ll need a “fake” certificate so you can do HTTPS requests with localhost. Otherwise Early Hints won’t work. See this post for more information on the following.
Run this command:
openssl req -x509 -nodes -days 365 -newkey rsa:2048 -keyout localhost.key -out localhost.crt
And follow the prompts. I hit enter for everything. Then move your certificate and key into your h2o folder since that’s where the config is looking. If you want the cert to live somewhere else, update your h2o.conf with that new path.
Now start the h2o server with the config: h2o -c h2o/h2o.conf
And start your Rails server (if it’s a Rails 5 app you will automatically be using Puma. This will not work if you’re not using the Puma branch I linked above): bin/rails s --early-hints
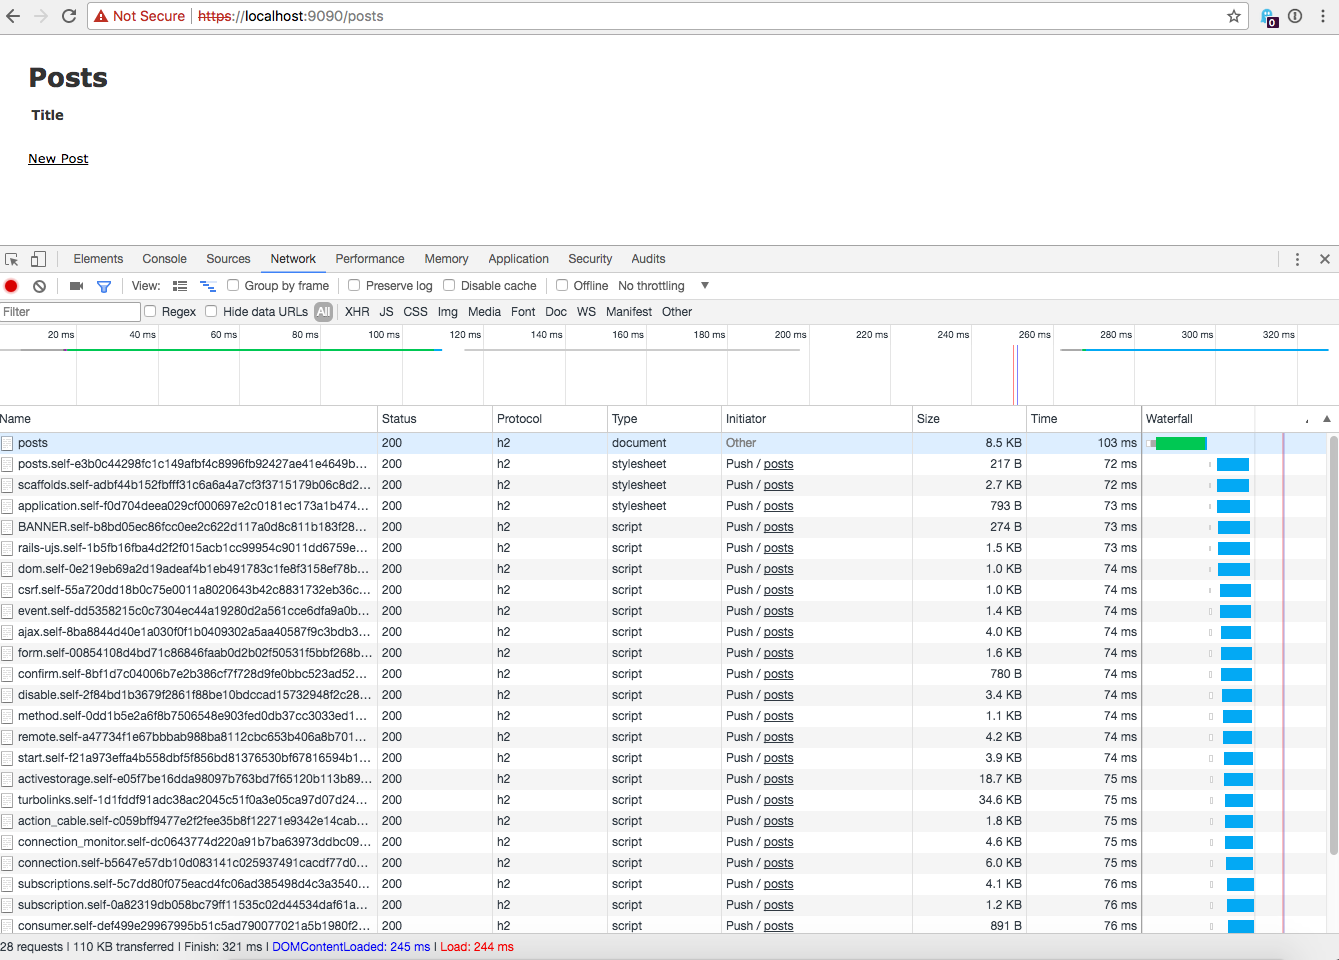
Open Chrome and go to https://localhost:9090/someurl replacing someurl with a URL you know uses a javascript_include_tag or a stylesheet_link_tag because that’s the way Early Hints is currently implemented in Rails.
Open the Chrome dev tools and go to the network tab. From there you should see Push / posts where posts is the URL you entered under the “Initiator” column. Below is a screenshot of my Chrome dev tools showing the Early Hints loading. If you click the image to load the full side it is easier to view.
My Process for Writing a Talk
There’s a ton of blog posts out there with advice on how to write talks. They all discuss the “right way”, but in reality I don’t think anyone follows a process prescribed by someone else.
I’m a very visual person and in a way I write talks backwards. “The right way” would be to write copy and then build the slides around it. I shouldn’t even be opening Keynote until I have solid, well-articulated copy. But that’s not how I’ve been writing talks.
I’m definitely not recommending you follow my way of doing things, but I thought it would be fun to share my process. I’ve developed approximately 6 talks between meetups and conferences. I put a lot of time and effort into each one. My How to Performance talk was probably 100-120+ hours depending on if you count revisions and practice I did before each conference.
Here’s my process:
-
Talk to anyone who will listen about something I’m passionate about or working on recently. The talk I’m currently writing is about Security. I’ve ranted and explained all sort of things I believe about security and patching applications to anyone who will listen; my dog, my husband, my friends and coworkers. If I keep talking about it enough, I know I care about it enough to turn it into a talk.
-
Collect ideas in a Google doc so I can access the file anywhere.
-
Come up with a title (see I told you this was backwards because this is “supposed to” be after an abstract)
-
Write an abstract.
-
Write something, anything down that resembles a beginning, middle and end of an abstract
-
Show it to my husband who tells me how to write a better one
-
State that I can’t do this, I don’t know how to do this

-
Go to the gym and work out my frustration
-
Come back and bang out a kick-ass abstract
-
-
Write an outline. This is where it starts to get weird.
-
Open Keynote and pick colors. Colors are very important to me. I was a photography major and have a design and art background. If the colors don’t feel right I can’t write the talk.
-
Collect memes and gifs to help express myself.
-
Build out the middle slides; the meat. This is generally where I start adding all the gifs I’ve saved over the past couple months that I think would go great with sentiments I have in the talk.
-
Freak out that this talk isn’t going well and it will never be good. I’ve given 3 well liked talks at 8 conferences and I still believe they were a one-hit wonder and no one will like any future talks. This is something I deal with every time, and it’s hard. It’s difficult to tell yourself you’re going to be fine. That’s why it’s good to have a great support system of family and friends who will help pull your head out of your ass so you can keep working.

-
Start writing copy for the beginning slides I never added. Add slides to fill in the opening of the talk as I write them.
-
Write the copy for the ending slides I never added. Add slides to fill in the end of the talk as I write them.
-
Go back to the middle slides and write the copy for those adding, removing, and reordering slides as necessary. Once I’m satisfied the talk is “written” I go back and edit copy. Written to me just means I could go give this talk as is and it would be complete, but confusing. It’s not perfect but all my main points are in there.
-
Give talk at a local meetup.
-
Make changes based on the meetup feedback.
-
Practice. Edit. Practice. Every night for 2-3 weeks leading up to the conference.
-
Give talk at a conference.
-
Make changes based on things I felt were confusing and based on questions/feedback I get.
-
Repeat 15-17 until I retire the talk.

This process, while convoluted at points, is my process. This works for me. Don’t let anyone tell you you’re doing it wrong. It’s your talk. If you a) get up and actually do it or b) people find your talk interesting, then you were successful. Find what works for you and what gets you up there on that stage. That’s all the matters.
I’m giving talks at 4 conferences so far this year. Mountain West Ruby Conference in March, Twilio’s SignalConf in May, Brighton Ruby Conference in July, and AbstractionsConf in August. You can always find what conferences I’ll be at on my speaking page.
Rails 5: The Sprockets 4 Manifest
When Rails 5 is released it will require that you upgrade to Sprockets 4. Sprockets 4 has some big changes in how it knows what assets to compile so you will definitely have some updates to make if you rely on Sprockets within Rails. Since there are a lot of changes in Sprockets 4 I’ll just be talking about the new manifest.js in this post.
With Sprockets you used to tell your config/initializers/assets.rb what assets were supposed to be precompiled. In Sprockets 4 you will use a manifest.js inside your app/assets/ directory to tell Sprockets what assets to precompile. This behavior is actually available to use in Sprockets 3 but sprockets-rails has a conditional that only activates this in Sprockets 4.
# sprockets-rails/lib/sprockets/railtie.rb

if using_sprockets4?
  config.assets.precompile  = %w( manifest.js )
else
  config.assets.precompile  = [LOOSE_APP_ASSETS, /(?:\/|\\|\A)application\.(css|js)$/]
end
Note: the file type that manifest.js is stored as may change. There is disucssion around moving the manifest.js to manifest.yml because it doesn’t make sense that the manifest has a file type that is unrelated to it’s usage.
So, how do you use a the new manifest file? In your app/assets/ directory add a new directory named config/. Inside that folder add a file called manifest.js.
In the manifest.js you’ll want to link your JS and CSS directories as well as any other directories you rely on like images, fonts, sounds etc.
Here is an example of a manifest.js that links JS, CSS, fonts, and images.
// JS and CSS bundles
//
//= link_directory ../javascripts .js
//= link_directory ../stylesheets .css


// Images and fonts so that views can link to them
//
//= link_tree ../fonts
//= link_tree ../images
Previously you didn’t need to include fonts and images in your precompiled assets list and Sprockets Rails would use the LOOSE_APP_ASSETS constant to figure out those items, but now you have to explicitly include them in your config.
You’ll notice that we use link_directory for CSS and JS, then the path from the config manifest file to the javascript “file”. We compile .coffee and .scss down to .js and .css, respectively, so we denote that after the path to the JS and CSS files to tell Sprockets what to compile them into. Images and fonts don’t change file type when compiled.
Once you’ve done that you’ll need to remove config.assets.precompile from your config/initializers/assets.rb.
config.assets.precompile += %w(
  all.css all.js
)
Smaller apps may only have the precompile directive in their applications so in that case you can delete the config/initializers/assets.rb file. For larger apps, like Basecamp we have some extra settings regarding assets and didn’t want to delete the config file.